I decided to take a break from the construction of the Mouse House structure and work on some of the “built-ins” instead. After debating about its placement, I’m now planning to install a fireplace with surrounding bookcases in the study.
I started by building the fire box that will sit behind the mantle. I painted the interior black then lined it with paper on which I drew a grid that simulated large tiles. I then made a rock floor using the same technique as the basement floor. After sealing all with Mod Podge, I added chalk dust to simulate soot and sealed it again.
The firebox, painted black.
The “tiled” grid for the back of the box.
Torn egg cartons simulate the stones on the floor.
The finished floor of the firebox.
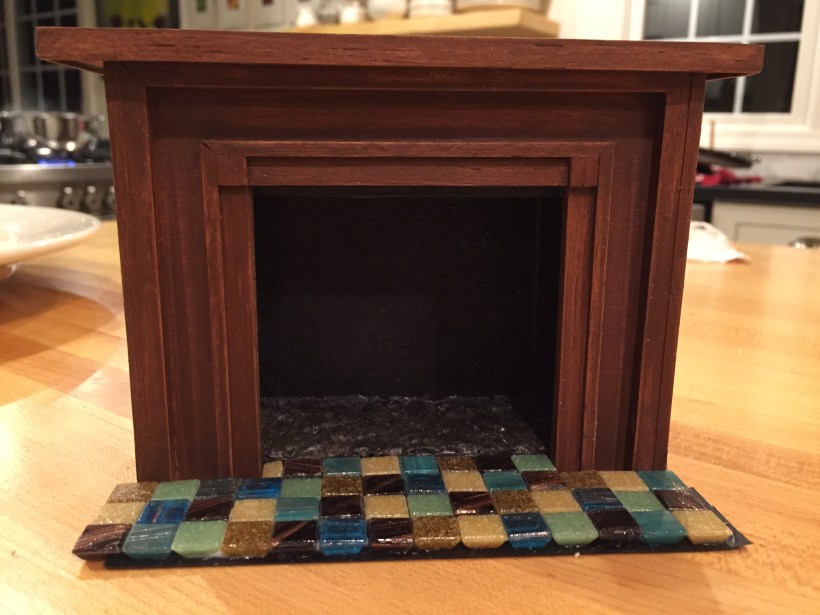
The mantle was designed as it was built. I used basswood for the construction and just added trim until I liked the way it looked. The wood was stained with acrylic nutmeg.
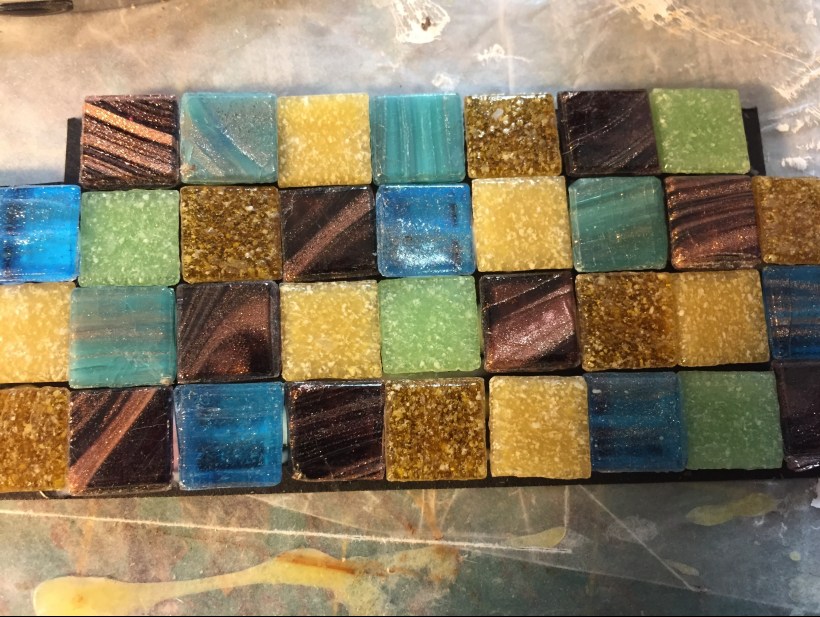
Serendipity styled the hearth as I happened to stumble on the small tiles yesterday at Michael’s—on sale, no less!
The fireplace hearth. I’m pretty sure I glued the tiles on the template upside-down, but I liked the flat look of the bottoms better than the textured tops.
(I’ve learned to wander every aisle at the big box craft stores as I never know what I’m looking for until I see it. Actual tiles like these were not in the plan, but at $1.99 before coupons they fell into my cart!)
Tomorrow I hope to add trim to the hearth and start on the bookcases.
Because of the wonky construction and decor in the Mouse House, I’m installing a variety of floors. I’ve used coffee stirrers, craft sticks, balsa wood, shims and vinyl for the “wood” floors.
Pantry: coffee stirrer sticks, stained with coffee.
Dining room: craft sticks and nutmeg, acrylic craftstain
Storage Loft: shims and light stain.
Master bedroom: strips cut from vinyl flooring.
Study: balsa wood, painted with three colors of acrylic paint.
The process is straightforward. I cut the strips of the “wood” I’m using into a variety of lengths and glue them in random patterns directly on to the Mouse House room floor or on a thin cardboard template cut to fit the floor. I flatten this with heavy books until dry then stain or paint them as desired.
I wanted a whitewashed, distressed look for the art studio, so for this particular floor I diluted white paint with water and brushed it on. I then weighted the floor again and let it dry, then sealed that with Mod-Podge and let it dry. Finally, I distressed the floor with a knife and this cool tool I found in Andy’s workshop, then rubbed very diluted black paint into those grooves with a paper towel. With one more coat of Mod-Podge, the floor was done.
Diluted white paint applied to the glued wood floor.
Distressing the flooor.
Black paint rubbed into the grooves.
The finished floor for the art studio.
The “tiled” floors are done in a similar fashion. I glue paper squares on to the floor template, distress them with dabs of pastel chalk dust, then seal them with several coats of Mod-Podge.
Black and white squares cut from card stock.
Finished kitchen floor.
Paper-tiled floor for hallway.
I “got lucky” with two floors, the laundry room and bathroom. I found scrapbook paper in my stash that already looked like tile for the Mouse House laundry room, and sheets of foam squares (in yet another bin in my studio!) that once distressed, worked perfectly in the bathroom.
The laundry room floor made with scrapbook paper.
The bathroom floor made with foam,, adhesive squares.
So far, I think the basement is one of the coolest thing about the Mouse House. I’m particularly pleased with the stone floor.
Making it was fairly easy. First I painted the floor black. Then I tore cardboard egg cartons into small stone shaped pieces and glued them in place. I used pastel chalks to dust color on each stone–red, brown, gray, black and green–then sealed it with mod-podge.
Finally, I made a slurry with cement and acrylic matte-medium and “grouted” the floor, carefully wiping the mess off the top of each stone so essentially this cement filled the gaps. Once this dried, I again sealed it all with mod-podge.
The walls of the basement were a bit of a challenge. At first I attempted to duplicate plaster walls with tissue paper. This resulted in an awful mess.
Crumpled tissue.
Dried crumpled tissue. Ugh.
Brainstorming, I thought I could cover the walls with some sort of rough fabric and paint, so I dug through my stash to find a scrap with the right texture. When I stumbled upon a piece of wool quilt batting the lightbulb went off. I figured if I could glue it on while maintaining its pebbly surface, it could resemble plaster. I concocted a mixture of glue and paint and slathered it over the batting so it became saturated and glued it to the wall.
I was careful not to smooth it too much, so once it dried it was still rough. I’m pleased with the result; after I aged the dried walls with brown and green paint and added rough wood beams across the ceiling, I think it looks very much like a “Michigan” basement.
…but I don’t really have one. Basically I scribble ideas for the Mouse House on scrap paper that I immediately lose. When I do stumble across these notes, I can’t decipher them anyway. I measure as I go and change my mind constantly.
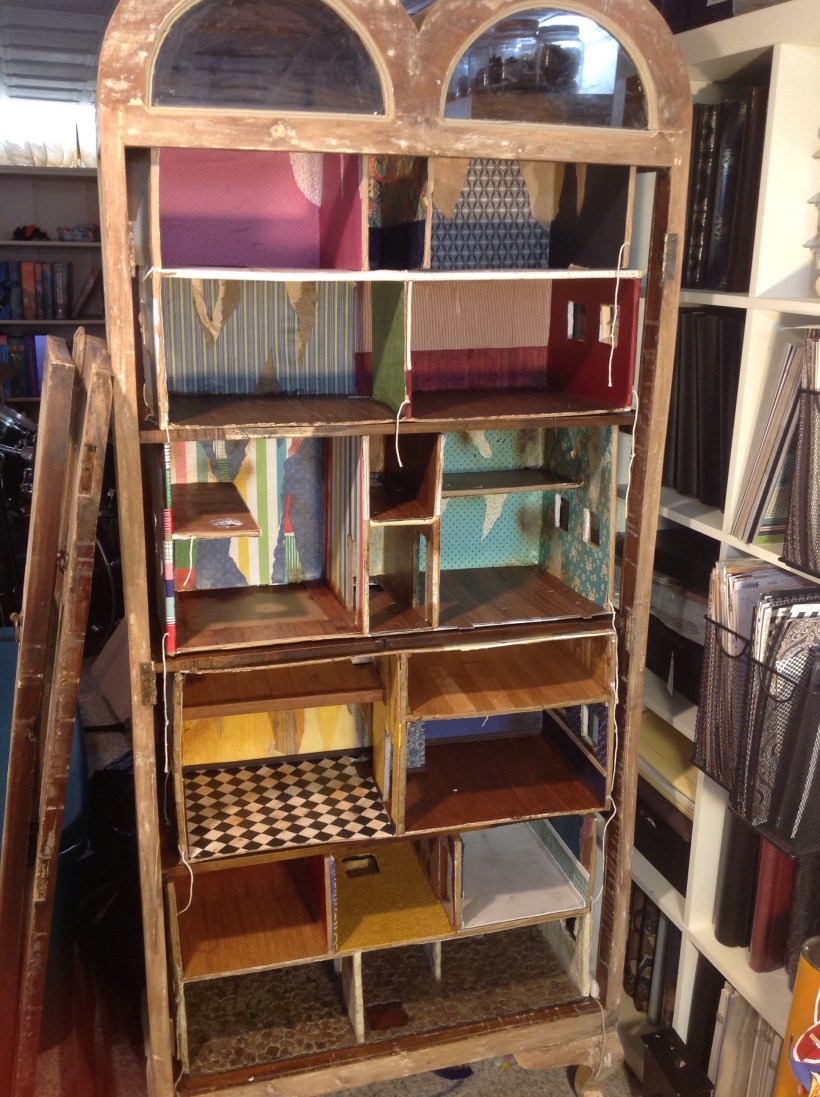
The true starting point began when I decided to build the Mouse House within a cabinet. I love the idea of turning a key and opening doors to a secret world. I also know that Andy may be amenable to having the finished project upstairs if it looks less like the reality of cardboard boxes glued together. Plus, I hate to dust.
I found the perfect cabinet the very first day I looked. (The arched windows at the top is what sealed the deal!). It was on Craigslist for a reasonable price and I bought it the next day. I stripped the charming but crumbly paint off the exterior and it now resides in our basement with the doors off.
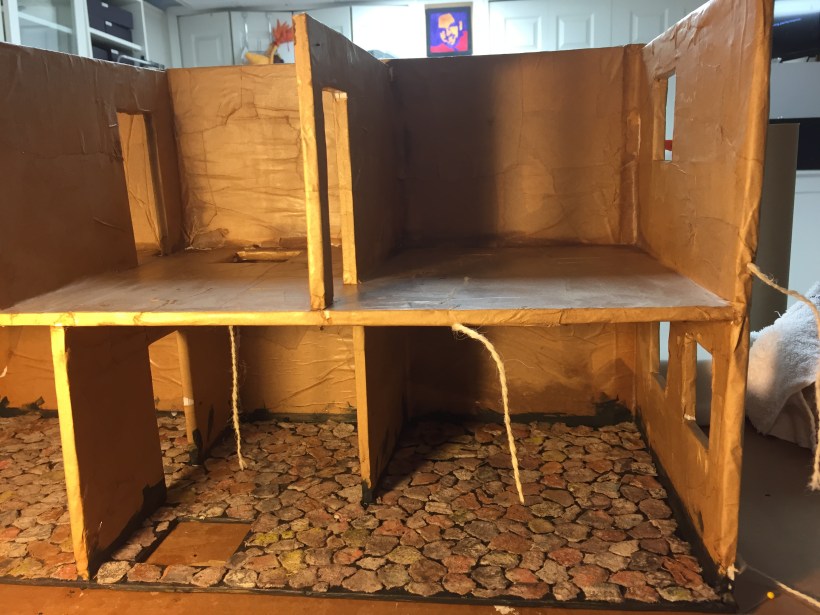
Because I built most of the structure before I decided to blog, I don’t have photos of the step by step construction of each room, but I can share the basic idea with the units I’ve already constructed. I started by building room “boxes” that slide on to each shelf. I built them out of foam board and then glued butcher paper as paper mache to make each box quite strong. I had to plan and cut holes for the windows and doors from one room to another.
The room box that will slide onto the bottom shelf of the cabinet. This will house the entryway, furnace room, workshop, pantry, laundry room and bathroom. The “stone” floor was installed after the paper mache was dry (more on that later) and the strings threaded through the walls and ceiling will (hopefully!) serve as guides for the future electrical wires.
I decided to cut a hole on the floor at the back center of each room box so a ladder can be installed that will allow the mice to travel from the bottom of the house to the top. Of course this means I’m going to have to cut holes in the back center of each fixed shelf in the cabinet as well. I’m not sure how I’ll do this yet, but I’ll “think about that tomorrow.” The picture above also shows the hole for the trapdoor to the outside of the cabinet; after all, the mice need a way to get in!
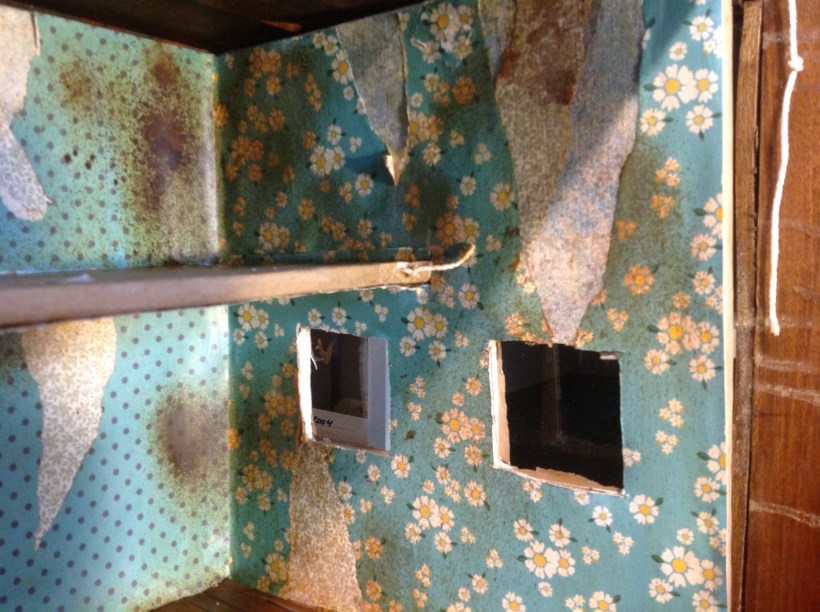
The boxes for each shelf are already almost finished. I had a great time choosing the “wallpaper” for each room. Since I want the Mouse House to look a bit ramshackle, I used layers of different papers and tried to make it look like it was water damaged and peeled.
The master bedroom with the nursery loft.
I also tried various methods of flooring and am happy with the hodge-podge. I’ll post more about the walls and floors in a different post, but in the meantime, here’s a shot of all of the room boxes in the cabinet so far.
Decades ago, when my cousin Amy and I were first allowed to take a city bus to the local mall without our moms, we each purchased 6 inch tall anthropomorphic pigs. These tiny stuffed creatures instantly enhanced our adolescent once-a-year-at -Thanksgiving cousin relationship as we spent several subsequent holidays building their worlds.
Pig similar to our pigs. Artist unknown.
We made clothes, furniture, rooms and accessories for each of them and even began a newspaper dedicated to the pigs’ activities. Looking back, I think those pigs were a safe way to stay both a tomboy and young–after all, they were pigs, not dolls!
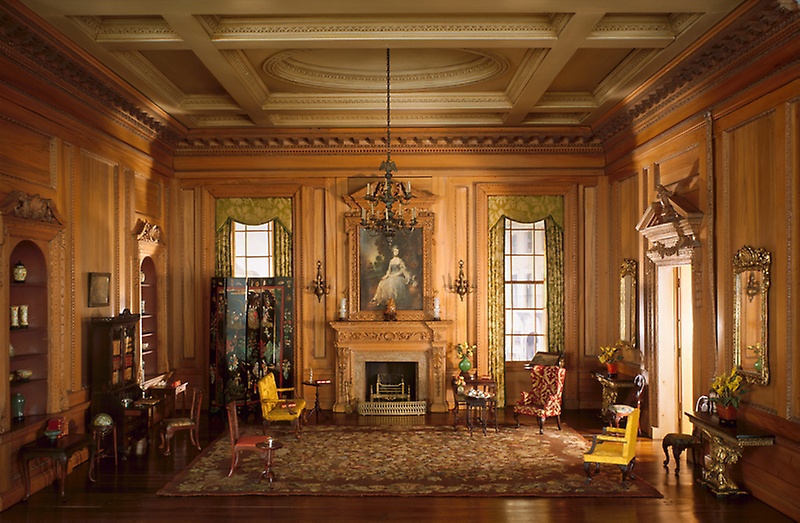
Recently, the desire to build a world in a small scale returned. I spent lots of time on the internet, exploring the incredible creations of miniaturists all over the world. I’ve been in complete awe of the artistry and perfection of the dollhouses I’ve seen and overwhelmed by the time and money that must go into them. I know my limitations–precision and large budgets are not in my wheelhouse.
Mrs. James Ward Thorne, English Drawing Room of the Early Georgian Period, Miniature Room, Art Institute of Chicago.
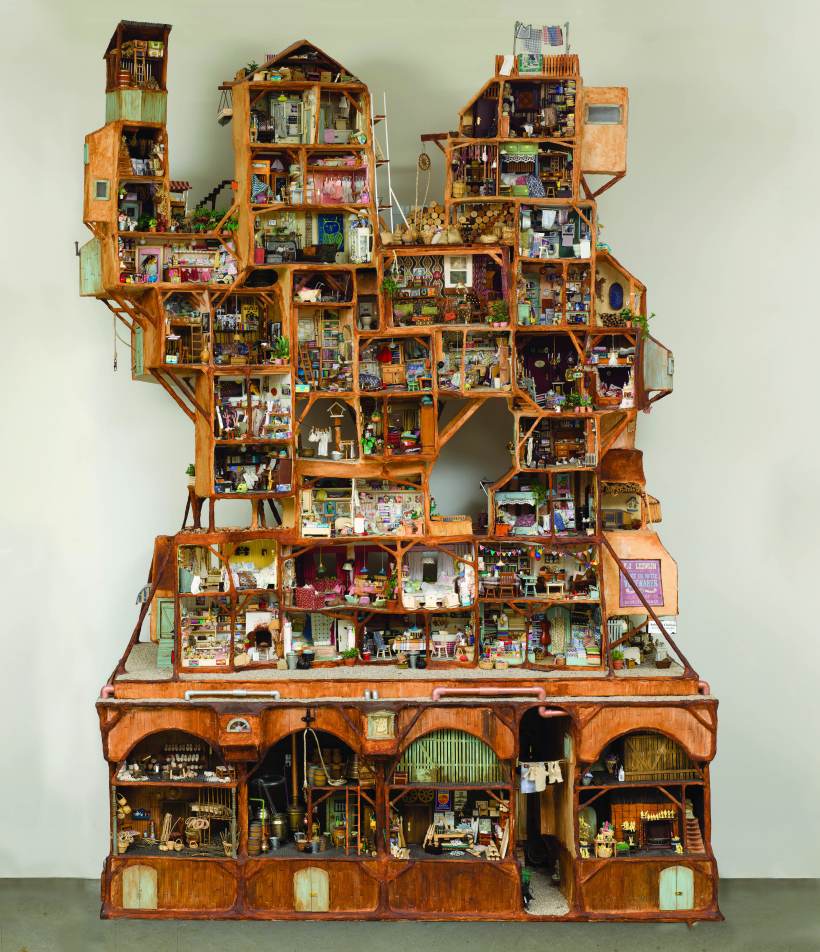
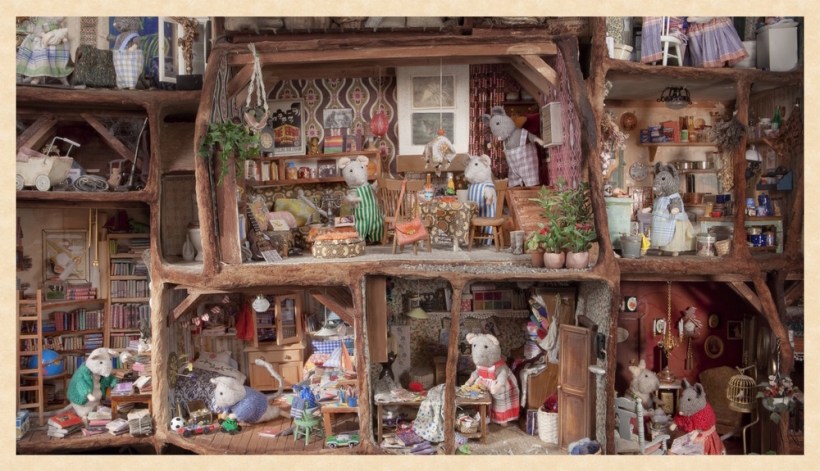
Then one day I saw it online: the Mouse Mansion in Amsterdam. Built over four years by Karina Schaapman and currently displayed in the Children’s Library in Amsterdam, this wonky, quirky, messy creation instantly ticked all of the boxes and I knew immediately that this was the style I wanted to adopt.
Karina Schaapman, Mouse Mansion, Children’s Library in Amsterdam.Detail of the Mouse Mansion by Karina Schaapman.
It’s a world of make-do, of crooked floors and peeling paint, of questionable scale and anything goes. It’s a miniature mansion that speaks to me in so many ways and building something similar is my new obsession. This blog will document my progress as my own Mouse House comes together.
Long before blogging was popular, I had a website showcasing my art. It worked well; I could post pictures of my latest pieces and sell items via my site.
“Unzipped” (detail), by Joan Potter Thomas, 2017.
Yet as often happens to those with best intentions, I left the website on idle as I juggled a part-time job, three teenage boys, an overworked husband and a dog. With complete naïveté I thought my pages would just hang out on the internet clouds until I got back to them. Ha! Nope. Due to this neglect, my “domain name” expired and was scooped up by a very cruel pirate. Now, joanpotterthomas.com is a site devoted to, as best I can tell, a Japanese company selling butt acne cream. I am not kidding–go ahead and look.
Sooooo…..I am moving on. With encouragement from family and friends, I have decided to blog about my latest project. I am approaching this as an annotated photo album for my own benefit (to document where the hours go!) as well as a way to keep those not willing or able to wade through the detritus in my basement to see why I never return phone calls or respond to the doorbell.